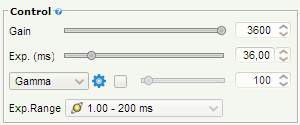
Gain Manual gain control
The
supported range depends on the camera model. The current gain value
will be shown as ToolTip by holding the mouse over the slider.
Note: Depending on the camera this control may not
be available or working properly if you running the DirectShow (WebCam) interface of
FireCapture.
Note for Point Grey cameras:
Some Point Grey cameras allowing an extended gain range by using the
absolute values interface (Thanks to Anthony Wesley for letting me
know). FireCapture detects this extended range automatically during
cam-initialization and adjusts the gain slider accordingly. The gain
value divided by 100 is the gain in dB (i.e. 3100 = 31.00dB). A max
gain value above 2500 usualy indicates that you are successfully
running the extended range because standard max gain for PGR cams
would be about 24db (= 2400). You can disable the extended gain feature by setting "useExtendedGain=false" (see: Configuration).
Some other camera interfaces supporting extended gain as well. Watch
the tooltip when changing the gain it will turn to red when running in
extended gain range.
Hint: You can control the gain with the keyboard by pressing the up/down arrow keys
Shutter Manual exposure control
The
supported
range depends on the camera model. The current exposure value (in
milliseconds) will be shown as ToolTip if you hold the mouse over the
slider.
Note: Depending on the camera this control
may not be available or working properly if you
running the DirectShow (WebCam) interface.
Note
for TIS-DMK cameras:
FireCapture will automatically keep the
current exposure value in sync with the fps rate. If you change the
shutter to a value which is too long for the current frame rate
the fps value will be decreased automaticaly and vice versa. Using this
automatic you can always be sure getting the maximum possible frame
rate out of your DMK and you don't have to care about setting the fps
back to higher values if you shorten the exposure. You can turn
off this synchronisation by setting "syncFPS=false" in the
FireCapture.ini
Hint: You can control the exposure with the keyboard by pressing the left/right arrow keys
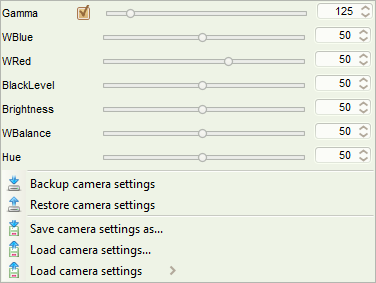
Gamma
and additional controls
Depending on your camera model there may be additional manual controls
available which will be shown in a drop-down box below the shutter
control. Some of them need to be enabled first using the checkbox. Also
the whitebalance controls for color cameras will be available in this
drop-down box. Click the cog-wheel button right beside the gamma
control to open a popup showing all available controls:
You can edit all control directly from that menu and you can load/save camera settings.
FPS Set the cameras frame rate (FPS)
By
default the camera will be started with no fixed FPS rate so the
effective FPS rate is defined by the exposure time. If the camera
supports this you can insert any FPS rate and press enter. Use the checkbox
to enable/disable a fixed FPS rate.
Exp.Range Set a new exposure range
On
some cameras the usable exposure range is huge. If we would map the
full range to the exposure slider adjusting the exposure
value would be nearly impossible because the steps would be to large.
For that reason the Exp.Range control has been introduced. I virtually
splits the full range into sub-ranges allowing a finer exposure
control. For the (newer) DMK cameras there are 3 ranges available.
The 3rd range is used for long exposures up to 1 hour only so take care
when switching to this range. On other cameras (e.g. Basler scout) that
range control will be used as the timebase factor for the exposure.
Holding the mouse over the exp.range control will show you the current possible exposure range (in milliseconds).
Control dialog Open the camera control dialog
This
will open the native camera control dialog provided by the underlying
camera driver (if supported). Because the dialog is called
inside a dynamic link library there is no guarantee
if this function works properly.
 Control dialog