Select a capture profile
Capture
profiles are a nice thing to have in
FireCapture. The idea behind is that typically you capture the same
objects (e.g. Planets, Moon) on a repetitive time base throughout the
year. So a profile simple stores some capture details related to a
particular object and makes reloading them easy by just one click. All
capture profiles are located in the\profiles
sub-directory of FireCapture. Those profiles are simple
text-files ending with *.cap (cap stands for "capture": it
took me a whole day inventing this extension ;-).
For
creating/editing a profile place the mouse cursor in front of the
profiles drop-down box and right click. A popup-menu shows up.
Clicking on "Edit profile..." will open the related profile
settings tab where you can add/edit/delete profiles.
Filter The available filters The current filter will be used as prefix in the capture
filename if the related property is checked (see: capture
settings tab).
For defining your own set of filters see: filters settings tab
For quickly changing between filters using the keyboard see the
available Shortcuts
Type File format of the capture file
Specifies
the format of the capture file. Currently supported formats in
FireCapture are AVI, SER, BMP, FIT and TIF. The
default formats when capturing 8bit data is: AVI, BMB and SER. If your
cam supports 12bit effective data and you have enabled the 16bit
checkbox from the camera panel the supported formats are: FIT, TIF and
SER. For BMP,
FIT and TIF files you can enable zipping to an archive file from the capture
settings tab. This reduces
the file size, gives better performance and makes file
handling easier.
File Target file for capture
The path and filename depends on the properties selected in the capture
settings tab. You may also check the
"Auto-create subfolders" option (see capture
settings tab)
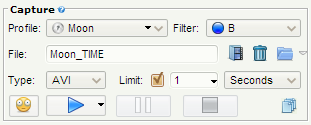
Hint:
If you stay with the mouse over the button the full path of the capture
file and the remaining disk space will be displayed
Limit Set the limit of your capture
If
you want to stop the capture automatically after a specific limit
(time,
number of frames or filesize) has reached you can use the "Limit"
checkbox.
Simply
insert your desired value (seconds, number of frames or MBs) into the
text
field and start capture. Capture will be stoped automatically if
the
limit is reached. Richt-click on the limit field to select the limit directly from a popup menu. Select capture folder
Select the root folder for the capture files. Same as in capture
settings tab Delete Delete last captured file
If
something went wrong and you premature canceled your capture you can
use this button to delete the last captured file. It will show a
confirmation dialog with the file details.
Open folder
Opens the current capture folder in the Windows explorer.
Capture buttons These buttons control your capture
Right-click on the capture button to directly jump to the AutoRun option. You can also start/stop capture using the keyboard with Enter/Esc
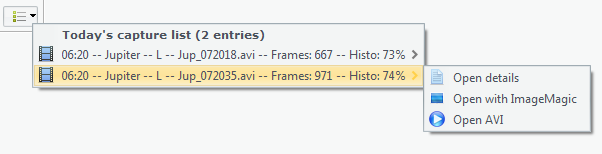
Open session browser Opens the session browser in a separate window
If
you right-click on that button a list with the details of the captures of the current session will be shown. Every entry has another submenu. See details in the screenshot below.